Mastering the Clean Up Tool in Apple Photos: A Step-by-Step Guide
- Technology Paul
- Oct 9, 2024
- 3 min read

In iOS 18 Apple Photos Has a New Clean Up Tool That Changes The Game
The Photos app has been a staple for capturing and managing memories, but its latest updates in iOS 18 bring a killer feature: the Clean Up Tool. This new Apple Clean up tool in photos lets you remove unwanted elements from your pictures, creating clean photos with just a few taps. Whether it’s a photo bomber in the background or a small detail that disrupts your shot, the Clean Up Tool can handle it all. This post will explore how to use this new feature and how it can transform your photo editing experience.
What is the Clean Up Tool?
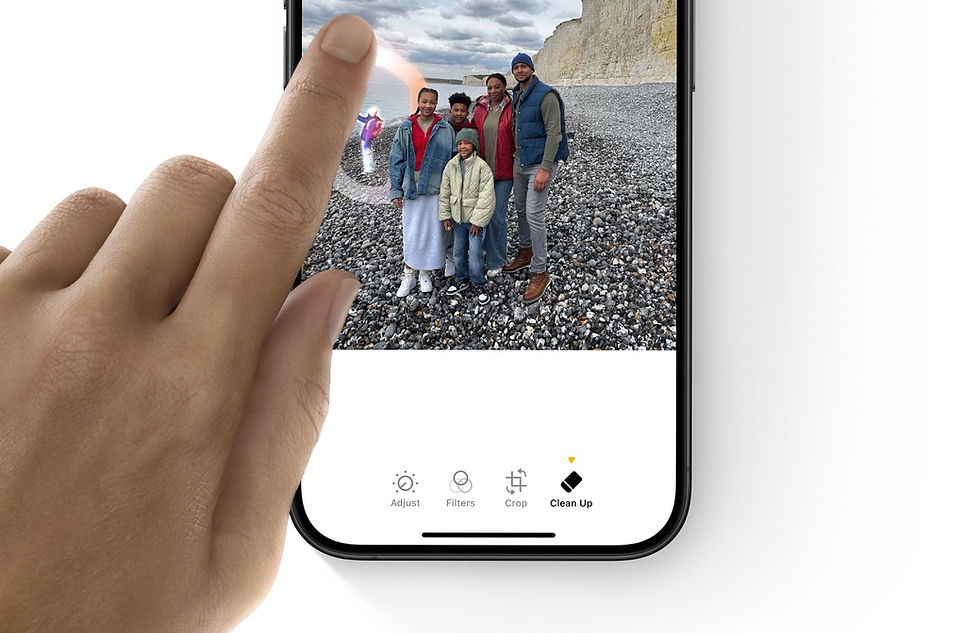
The Clean Up Tool is designed to remove objects, or people in your photos. It leverages AI to intelligently fill in the background, ensuring that the area where the object was removed blends seamlessly. It’s perfect for touching up vacation photos, removing unwanted distractions, or enhancing family photos.
How to Access the Clean Up Tool
Open the Photos App: Navigate to the photo you want to edit.
Tap the Edit Button: This opens up the editing interface with various tools.

Select the ‘Clean Up’ Icon: This is represented by an eraser icon.

The tool intelligently highlights items it thinks you might want to erase. You can see a sort of fluorescent multicolored lighting effect on those items.

All you have to do in that case is tap to erase it.
For items that aren’t highlighted automatically, simply just circle or scribble over them to initiate its removal.

And finally, you’re left with the finished product. Your image, without any unwanted objects.

Tips for Using the Clean Up Tool Effectively
Zoom In on the Area: When editing fine details, zoom in on the photo to get better accuracy. This helps in achieving a more natural look when removing objects.
Apply Gradually: Instead of trying to remove a large object all at once, apply the tool gradually. This allows you to see how the tool fills in each section, giving you control over the final result.
Real-World Examples of the Clean Up Tool
Removing Unwanted People: Let’s say you took a beautiful shot at the park, but there’s something unappealing in the background. Simply use the Clean Up Tool to highlight them, and watch as the tool blends the background seamlessly.
Clearing Up Urban Scenes: Got a great street shot, but a car or sign is ruining the vibe? Highlight the object, and the Clean Up Tool will replace it with matching textures, such as the pavement or building details.
Limitations and When to Avoid the Clean Up Tool
While the tool is impressive, it’s not perfect in every situation. Here are a few scenarios where it might not work as well:
Complex Backgrounds: If the background has a lot of detail (like crowds or intricate patterns), the AI might struggle to fill the area seamlessly.
Large Objects: Removing large elements from a photo can sometimes result in noticeably weird patches. It’s best to work in smaller sections.
Low-Resolution Photos: The tool performs best on high-resolution images where the AI has more data to work with.
Final Thoughts
The Clean Up Tool in Photos is a powerful addition that can bring a new element to your photo editing. It’s easy to use, quick, and leverages cutting-edge AI to create realistic edits. While it may not replace professional software for complex edits, it’s more than capable for everyday use.
Next time you capture a memory and find a little detail ruining the shot, give the Clean Up Tool a try—it’s as simple as a few taps!


Comments